
Your first client workflow
Use EasyAsPie to turn a useful observation about a business into a clear, deliverable piece of client work. This guide takes you from choosing a prospect to checking their website, agreeing the work, building a draft and looking after the finished site.
Start small: pick one kind of business, find one problem you can verify, and offer one defined improvement. You do not need to generate a complete website before someone has agreed to work with you. The examples below use Juniper Studio, a fictional business.
You will need an agency workspace, permission to use its tools, and credits for any paid scan or generation you choose. Read the price on each action before submitting it. Tool prices and plan availability can change; screenshot prices are examples of the interface, not a quote.
1. Prepare your agency workspace
Open your agency from the workspace selector. Add your agency's name, logo, website and support details in Settings. Invite collaborators through Team, giving each person the access their work needs.
Keep these places distinct:
| Place | What belongs here |
|---|---|
| Prospects | Businesses you are talking to, contact details, notes and their reports. |
| Tools | Website audits, Scoper and Brand kits. |
| Sites | The websites your agency currently manages. Open a site for its dashboard and Studio. |
| Tasks | Your team's work and follow-up conversations. |
| Clients | Client relationships and sites handed over to their owners. A listing is not permission to enter their account. |
| Contracts / Invoices | Agreed work and billing, subject to your permissions and payment setup. |
Decide who will contact the prospect, who will build, and who will check the result. Put the next action in a task so it does not disappear into a chat.
2. Choose an offer and find suitable prospects
Start with businesses whose work you understand: a local service, an independent shop, a creator, or a professional studio. Look for introductions through your existing network, businesses you already use, and relevant local business directories. Read each website yourself before deciding that it needs work.
A useful first offer describes the work and the customer journey it improves:
- Enquiry refresh: clarify the service page, improve the contact path and test the enquiry form.
- Launch site: build an agreed set of pages from approved copy, photos and business information.
- Brand-to-web package: create an approved visual identity and apply it consistently to a site.
- Care service: agree a recurring scope for content updates, checks and reporting after launch.
For example: “I help independent studios make their services easier to understand and their enquiry form easier to use.” That gives a prospect something concrete to discuss. Avoid promising a ranking, a sales increase or a perfect audit score.
For each candidate, record the business, website, appropriate business contact, the issue you observed, and your next step. A small, relevant shortlist is enough to begin. EasyAsPie's audit and Scoper tools inspect the website you provide; they are not an automatic client-finding or bulk-outreach service.
3. Pick the right tool
Open Tools in the agency navigation. These three tools serve different jobs.
- Audit a website: find checks worth investigating and prepare a report for a conversation.
- Scoper: collect the existing business story, contact information and visual identity into a report you can correct and use for a site draft.
- Brand kits: create a new identity or explore a revamp from a brief and an optional reference logo.
Use the audit when you need evidence about the existing site. Use Scoper when you need organized starting material for a rebuild. Use Brand kits when identity work is part of the agreed scope. They are not three mandatory purchases for every prospect.
4. Run a quick audit and check the findings
Open Tools → Audit.
- Enter the real Website address and Business name. Use a prospect’s public website address; check the displayed cost before running an audit.
- Optionally add the contact's name, email and phone. These are private prospect details, not part of the public report.
- Select Run audit. The result is saved with the prospect; an existing website is added to its prospect rather than listed twice.
Open the result and verify the important findings against the actual website. Choose two or three that matter to the business. Explain the visible problem, the affected visitor task and the improvement you would make.
For Juniper Studio, a useful observation might be: “On a phone, the contact link is difficult to find after reading the services. I would add a clear enquiry action there and check the form from start to finish.” Use that statement only if you actually observed it.
An automated check is a starting point. It is not a guarantee of search rankings, a security certification, or proof that a business is losing money.
When a deep audit is worth it
Open the prospect's deep-audit controls when a more detailed review would answer a real question. Read the scope, credit quote and any ownership-verification requirement before queuing it. The job runs in the background; wait for its completed report before using its findings. Failed and cancelled jobs show their own result and credit status.
There is no need to run a paid deep audit on every name in a cold list. First establish whether the business wants help and what decision the additional evidence will support.
Prepare the client report
Use the report, email and sharing controls available on the completed prospect report. Open the client-facing report before you send it. When Download PDF opens the print dialog, choose your browser's PDF destination and check the saved file.
Review the suggested email and replace generic wording with your verified observation. The audit email is a draft to copy into your own mail service; generating it does not contact the prospect. Treat a copied report link as shareable: send it deliberately and keep private contact details and internal notes out of anything you add to your pitch.
Completed deep audits have their own printable report and email-draft controls, even when there is no quick audit. Open the report, choose Download PDF and review the browser print output. The report links back to the saved prospect. Preparing an email draft does not send it.
5. Start a useful conversation
Lead with one observation and a small next step. Personalize the message, identify yourself, and respect a request not to be contacted again. Do not send a mass list the same alarming audit pitch.
Here is a starting draft to adapt after verifying the issue:
Hi [name], I'm [your name] from [agency]. I was looking at [business]'s services on my phone and noticed [specific observation]. I have a couple of ideas for making [visitor task] easier. Would a short walkthrough be useful? If this is not a priority, no problem.
Ask permission to share a report or short walkthrough. When you do, walk through the most useful findings rather than sending a long list of scores without context. Show what is working as well as what could improve.
After you contact them, move the prospect to Contacted, add a note with the date and outcome, and create a follow-up task. Use Won when they agree to the work and Lost when they decline or the opportunity closes. Avoid repeated follow-ups after a clear no.
6. Discover the real job and agree the scope
Before building, ask:
- What should a visitor do: enquire, buy, book elsewhere, read, or contact the team?
- Who is the audience, and which service or product matters most?
- What works on the current site? What frustrates customers or staff?
- Who supplies and approves the copy, images and brand assets?
- Which pages, forms and integrations are actually required?
- Who makes the final decision, and what is the target date?
- Who will own the site and pay for its plan after launch?
Turn the answers into a short scope: deliverables, exclusions, client-supplied material, review rounds, acceptance checks, timeline, payment milestones and ongoing responsibilities. Separate your agency's work from the client's EasyAsPie subscription and other services.
Use Contracts for the agreement where available. Review the document, recipient and sending cost before sending. Use Invoices after configuring the supported payment connection; confirm the displayed fees. A generated report or a new site does not mean a prospect has accepted a contract.
7. Use Scoper to prepare a reviewed site draft
Open Tools → Scoper, enter the website and optional business name, then review the scan price before selecting Scan website. The scan collects public business context and prepares a draft report.
Read and correct that report before creating a site. Check the business name, description, services, contact details, social links, logos and colors against the client's approved information. A scan can miss details or misunderstand the source.
When the report offers site creation, use the reviewed information to make the draft. The resulting site is kept hidden until you deliberately launch it. Creating a site and choosing its paid plan are separate steps; check the site's Billing page before changing its plan.
Do not publish copied client assets or an unsolicited redesign as if the business approved it. Get agreement on the material and direction first.
8. Build an identity with Brand kits
Open Tools → Brand kits when branding is part of the work. Access depends on the account's plan and permissions. Write a brief that gives the tool a useful direction:
Juniper Studio is a fictional independent interior-design studio. Its audience is homeowners planning thoughtful renovations. The identity should feel calm, precise and welcoming. Use warm neutrals with a restrained green accent. Keep the business name exactly “Juniper Studio”. Avoid decorative lettering that becomes hard to read at small sizes.
Add a reference logo only when you have permission to use it. Review the generation quote before submitting. Once the kit is ready, inspect the spelling, small-size readability, light and dark backgrounds, colors, fonts and social artwork.
Use the available manual text, color and font controls for adjustments, and Ask AI for a requested artwork revision. Manual edits and downloads are separate from paid AI operations. Save edits before downloading; choose the export formats offered for the asset. Downloaded copies are not live-linked to future kit changes.
Read the illustrated Brand kits guide for the workbench, larger previews and editing individual assets.
9. Build and review in EasyAsPie Studio
Open the site from Sites, then open Studio to edit its pages. Use the site dashboard for business information, media, forms and incoming leads. The agency workspace organizes the client work; the selected site's dashboard manages that site's content and operations.
Start with the approved page structure and one consistent visual direction. Use the theme's colors and saved styles so the site's buttons, headings and sections feel related. Reuse suitable sections, then tailor the content and layout to the business.
Give Jot a focused request, for example:
On the Services page, help me make the enquiry section clearer for homeowners. Use our existing theme. Ask about anything important that is missing and show a proposed direction before changing it. Keep it as a draft for review.
Check the target page, the proposed change and the result before applying or publishing. Review AI-written facts, prices, claims and contact details yourself. See Studio basics, Jot, and forms and leads.
Before the client review, test the real visitor journey:
- Read the pages at desktop and phone widths; check text wrapping and navigation.
- Follow every important button and link, including the footer and contact paths.
- Submit an agreed test enquiry and confirm where it arrives in the dashboard.
- Check image descriptions, readable contrast and keyboard access to key controls.
- Confirm business details, page titles and search previews.
- Record the client's feedback in Tasks, make the agreed revisions and check again.
10. Launch, hand over and keep the relationship useful
Get the client's approval of the final pages and agree who is responsible for billing, domain settings and ongoing work. Confirm the plan and domain requirements before launch. Publishing page changes and launching a hidden site are separate checks; verify the public website afterward.
Choose the ownership arrangement deliberately:
- Agency-managed: keep the site in your agency account, agree the ongoing scope and bill the client for your work.
- Client-owned: start the supported handover from the site's People area, using Built this for a client? where shown. Explain that the client receives ownership and their own billing responsibility. Your agency only keeps access if the new owner grants it.
White-label is a separate eligible agency option. Review its current availability, price and branding settings instead of assuming it is included.
At handover, show the client how to update the content they own, find enquiries and contact you for help. For an ongoing service, agree what is included, how requests are approved and when you will report back. Compare later checks with the original audit and actual business feedback; report measured changes without claiming that every improvement caused a sale.
Ask a satisfied client for an introduction or permission to publish a case study. Show the original problem, the work completed and the evidence available. Obtain permission before publishing their name, screenshots or results.
A repeatable first-week checklist
This is a suggested work rhythm, not a promise of a client within a week.
| Session | Finish with |
|---|---|
| Prepare | One audience, one scoped offer, your agency details and a clear example of your work. |
| Research | A small shortlist with a verified observation and appropriate business contact for each. |
| Check | A reviewed audit for a suitable prospect and two or three useful findings. |
| Talk | A personalized conversation, a recorded outcome and a next action. |
| Scope | For an interested prospect, agreed deliverables and the information needed to start. |
| Build | An approved direction and a private draft, with checks and client review scheduled. |
Ask questions and share what worked
Join the agency playbook discussion to ask questions about this workflow and share what worked. Browse the forum's Guides category for other walkthroughs. Mention the step you are working on so others can help.
Include the step, what you expected and what actually happened. Share a cropped screenshot when helpful, but remove contact details, private report links, client notes and credentials. For a success story, describe the offer and the work you delivered; publish client details only with permission.
Related guides: Brand kits · Studio · Forms and leads · Team access · Plans and billing.
Review a draft live
Invite the client as a signed-in Viewer or share an expiring page guest link from Studio. Choose the scope deliberately: the Viewer role includes the site's dashboard and visitor numbers; a guest link is limited to one unpublished page. Guests can highlight blocks, leave page-review comments and switch to Interactive to try the layout. Anyone holding a valid guest link can see the draft and its review comments. Do not use those comments for private agency notes. See Studio basics.
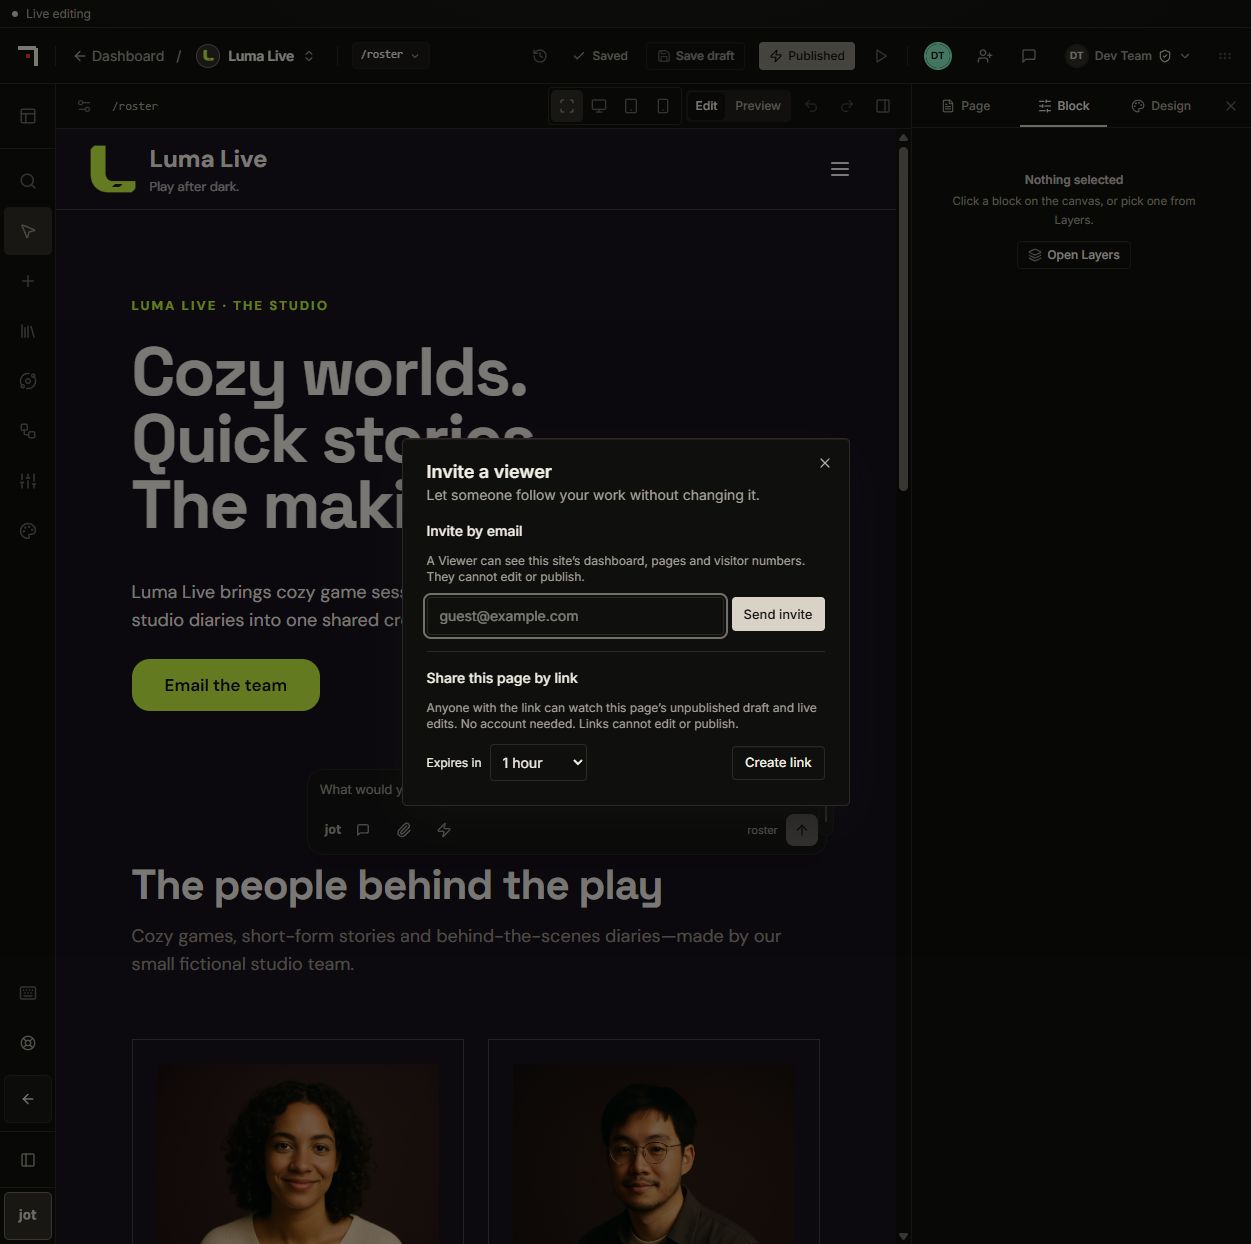 Email invitations grant the site Viewer role. A guest link grants access to one unpublished page and defaults to one hour. This capture sends no invitation and creates no link.Viewport 1251 × 1244px